
Learn to Play: Game Guide
Everything you need to run the Resilience by Design game — from the foundations of play through setup, gameplay, scoring, reflection, and a quick reference for the table.
Foundations of the Game
Sections 1–3 · What the game is, how resilience is built, and the pieces you play with.
1 Welcome to the Resilience by Design Game Why the game exists, the guiding question, and what success looks like
Communities face increasing uncertainty.
Communities are facing growing uncertainty as climate change increases the frequency and severity of extreme weather, infrastructure disruptions, public health pressures, and other interconnected challenges. Municipalities and local authorities are often on the front lines of these impacts and of the decisions that shape community resilience.
Responding effectively requires more than individual actions or isolated Projects. It requires people and organizations to work across departments, sectors, and jurisdictions; make strategic investments; and build the capacity to adapt over time.
The Resilience by Design game is a collaborative tabletop game designed primarily to help municipalities, local authorities, and their community partners explore how resilience is built in the face of climate change and disasters.
Through discussion, decision-making, and teamwork, players invest resources, complete Projects, build lasting capacity, and work toward shared Community Resilience Goals. Along the way, they balance competing priorities, limited resources, and uncertainty while exploring how collaboration influences resilience over time.
The game does not predict real-world outcomes or provide a complete model of community resilience. Instead, it creates a safe environment in which participants can test assumptions, explore strategies, and discuss what accomplishing greater community resilience might require in their own community or region.
The game can be used with municipal and regional staff, elected officials, emergency managers, infrastructure providers, Indigenous organizations, community leaders, students, practitioners, and residents. It is particularly useful when participants bring different roles and perspectives to the table.
Guiding Question
What does it take for people, organizations, and decision-makers to work together to build resilience in their community or region?
The Big Idea: resilience is rarely created by a single Project or investment
Communities rarely become resilient through a single Project or investment. Resilience develops over time as many actions, decisions, relationships, and investments work together to build lasting capacity.
In the game, players experience this process by turning resources into Projects, Projects into Permanent Bonuses, and Permanent Bonuses into broader resilience outcomes.
Through Play, Participants Explore
- Building lasting resilience through Projects and investments
- Collaborating across sectors, organizations, and jurisdictions
- Investing limited resources strategically
- Leading and making decisions under uncertainty
- Connecting resources, Projects, capacity, and resilience outcomes
What Success Looks Like
The Resilience by Design game is cooperative. Players work together to strengthen the resilience of their community or region by investing resources to complete Projects, build lasting capacity, and achieve Community Resilience Goals.
Before Play
During setup, players select one or more Hazard Scenarios relevant to their community, region, or learning objectives.
Each hazard scenario includes three Community Resilience Goals:
- one People Goal
- one Systems Goal
- one Decisions Goal
Together, these goals represent the resilience outcomes the community is working toward.
The game begins with a base Resilience Target. Each selected Hazard Scenario increases the target, reflecting the additional effort required to prepare for multiple or more complex risks.
Your Challenge
Before time runs out, complete Projects, build lasting capacity, and achieve enough Community Resilience Goals to meet or exceed the Resilience Target.
During Play
The team’s final score comes from two sources:
- completed Projects
- achieved Community Resilience Goals
Projects help build the Permanent Bonuses needed to build lasting capacity and accomplish Community Resilience Goals.
At the end of the game, the team compares its combined score with the Resilience Target established by the selected Hazard Scenarios.
Cooperative game
Players manage their own roles, Projects, and resources, but the final score is shared. The team meets — or falls short of — the Resilience Target together.
2 How Resilience Is Built The five-step cycle at the core of the game
At its core, the Resilience by Design game follows a simple cycle.
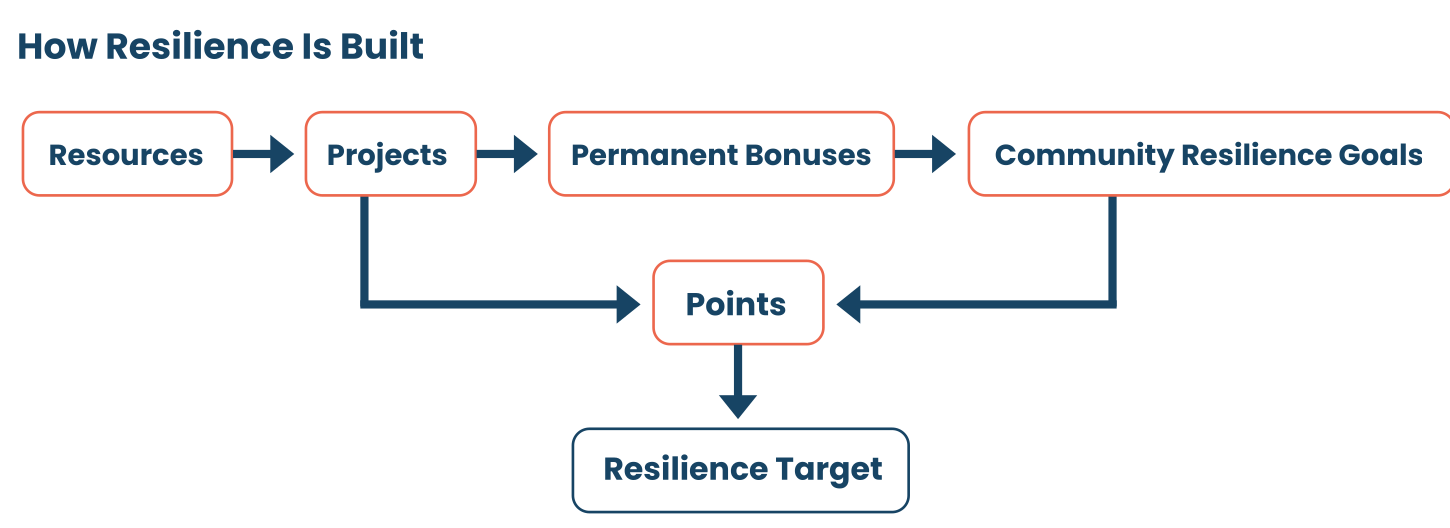
Figure 1. How resilience is built in the game. Resources are invested in Projects. Projects build lasting capacity through Permanent Bonuses and generate points. Permanent Bonuses help players achieve Community Resilience Goals, which also generate points toward the team’s Resilience Target. Every turn contributes to this process.
Key idea
Resource Tokens are spent.
Completed Projects build Permanent Bonuses that remain in play.
Permanent Bonuses make larger Projects and broader resilience goals achievable.
Step 1 — Collect Resources
Resources represent the funding, materials, knowledge, volunteers, and political support available to strengthen resilience.
Players collect Resource Tokens throughout the game and invest them in Projects.
Step 2 — Complete Projects
Projects represent actions, programs, partnerships, and investments that can strengthen resilience.
Players spend Resource Tokens to complete Projects and, in return, earn points and Permanent Bonuses.
Step 3 — Build Capacity
Each completed Project generates a Permanent Bonus representing lasting capacity created through investment and action. Unlike Resource Tokens, Permanent Bonuses remain available for the rest of the game.
As they accumulate, future Projects become easier to complete and more Community Resilience Goals become achievable.
Step 4 — Achieve Community Resilience Goals
Community Resilience Goals represent broader outcomes that become possible when sufficient capacity has been built. Goals are achieved using the Permanent Bonuses generated by completed Projects — not Resource Tokens held in hand.
Step 5 — Meet the Resilience Target
Completed Projects and achieved Community Resilience Goals generate points. At the end of the game, the team compares its combined score with the Resilience Target established during setup.
Meeting the target is one measure of progress. As in real community resilience work, learning, coordination, and adaptation are also important outcomes of the experience.
Why This Matters
Communities rarely build resilience through a single intervention. Individual Projects create knowledge, relationships, infrastructure, plans, and other forms of capacity that make future action possible.
In the game, Permanent Bonuses represent this lasting capacity: what remains after a Project is completed and what helps the community take on more ambitious work.
3 Understanding the Building Blocks of Resilience Components, resources, goals, Project cards, and Permanent Bonuses
Before beginning play, familiarize yourself with the components below. Each serves a distinct purpose in helping players understand the challenge, identify desired outcomes, make investments, build capacity, and track progress toward the Resilience Target.
Game Components
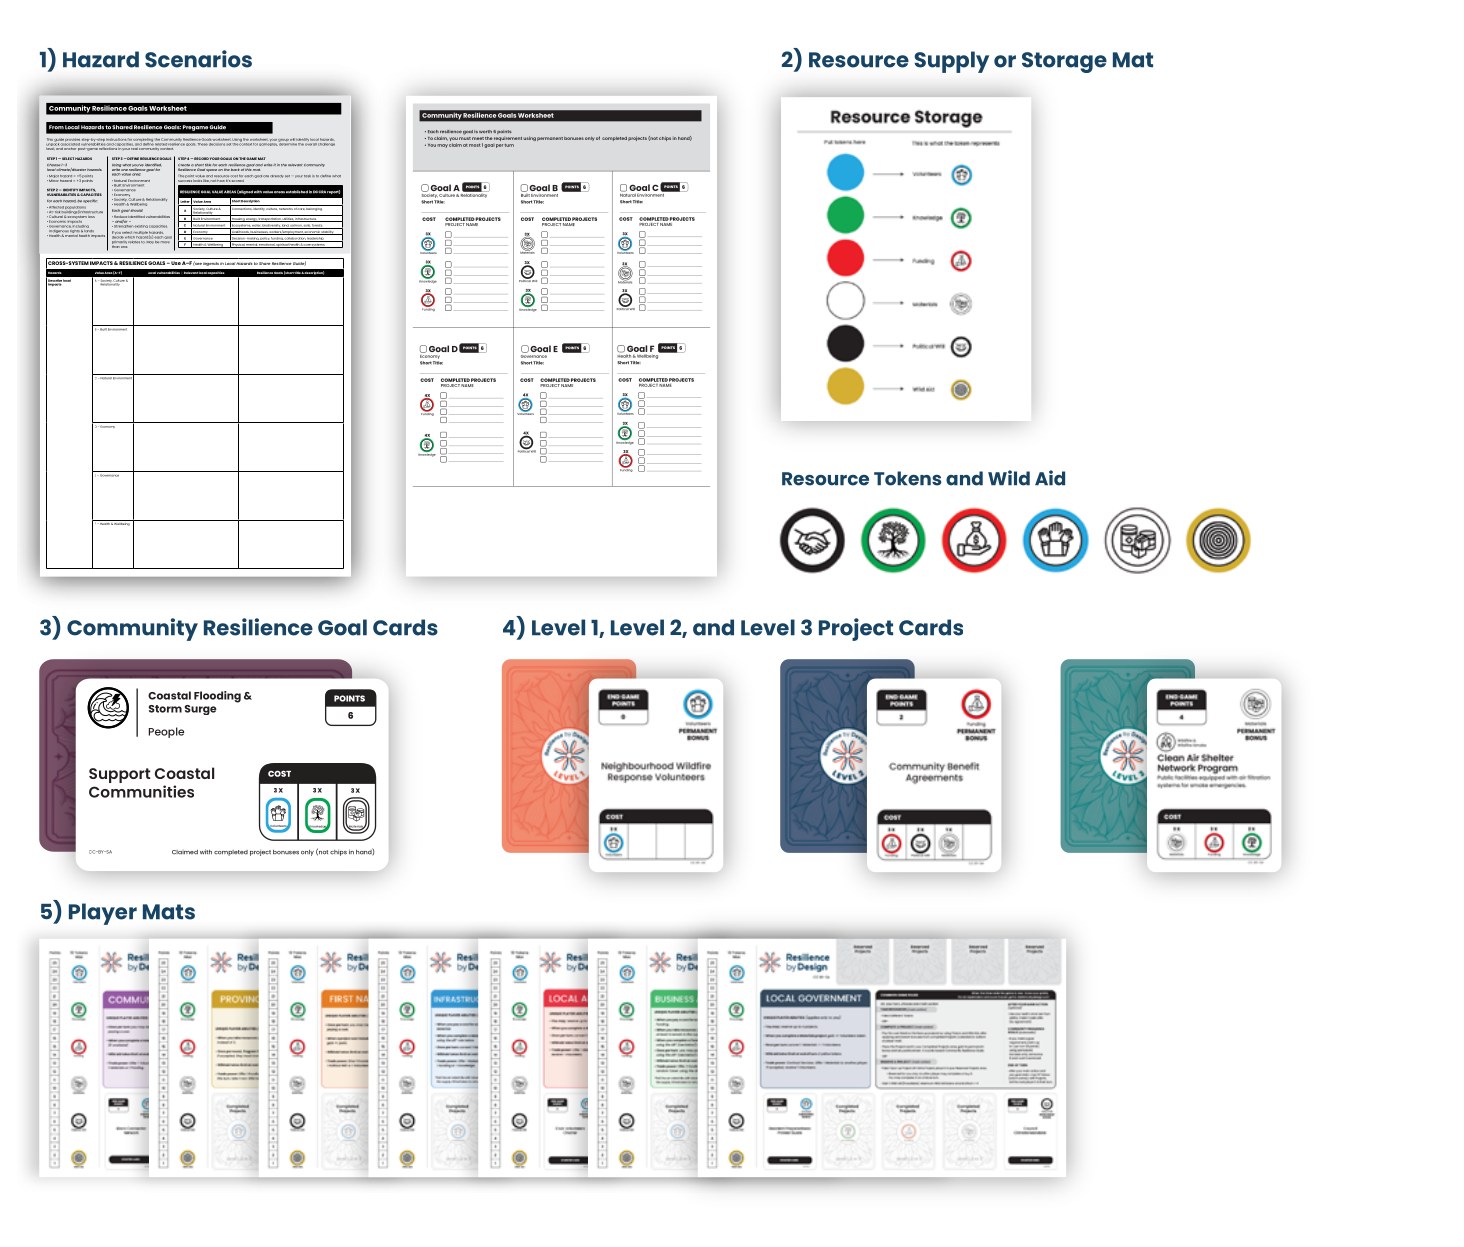
Figure 2. Game components and setup. The components work together to help players define the challenge, invest resources, complete Projects, build lasting capacity, achieve Community Resilience Goals, and track progress toward the Resilience Target.
The Five Building Blocks of the Game
| Component | Guiding Question |
|---|---|
| 1) Hazard Scenarios | What challenge are we facing? |
| 2) Resource Supply | What can we invest? |
| 3) Community Resilience Goals | What outcomes are we trying to achieve? |
| 4) Projects | What actions can we take? |
| 5) Permanent Bonuses | What lasting capacity have we built? |
Hazard Scenarios
Hazard Scenarios define the climate- and disaster-related challenges explored during the game. Each card summarizes common impacts and vulnerabilities, identifies useful resilience-building capacities, and links the hazard to three Community Resilience Goals. Selected hazards also determine which Level 3 Project Cards are included and how high the Resilience Target will be.
Resource Supply (Tokens)
Resource Tokens represent resources available for immediate investment. They are collected, traded where role rules allow, and spent to complete Projects.
Community Resilience Goal Cards
Community Resilience Goal cards represent the broader outcomes the team is working toward. Each selected Hazard Scenario contributes one People Goal, one Systems Goal, and one Decisions Goal.
Project Cards
Project Cards represent resilience-building actions, programs, partnerships, and investments. Players spend Resource Tokens to complete Projects and gain points and Permanent Bonuses.
Permanent Bonuses
Permanent Bonuses represent lasting capacity built through completed Projects. They remain available for the rest of the game, reduce the Resource Token cost of future Projects, and count toward Community Resilience Goals.
Understanding Resources
Resources represent different forms of support that communities draw upon to strengthen resilience. Players collect and invest Resource Tokens to complete Projects.
Each resource type reflects a different contribution to community action.
Remember: Resource Tokens represent what is available to invest now. Permanent Bonuses represent capacity that has already built.
Resource Types
| Resource | Represents |
|---|---|
| Funding | Financial resources available to support Projects, programs, and initiatives. |
| Materials | Equipment, infrastructure, supplies, land, and other physical assets needed for action. |
| Knowledge | Information, expertise, skills, experience, learning, and evidence. |
| Volunteers | Community participation, workforce capacity, relationships, and social supports. |
| Political Will | Leadership commitment, authority, influence, partnerships, and support for action. |
| Wild Aid | Flexible support that may substitute for any Resource Token when completing Projects. |
Resources Are Meant to Be Used
Resource Tokens only build resilience when they are invested. Holding resources may support future plans, but progress comes from turning resources into Projects and Projects into lasting capacity.
Wild Aid
Wild Aid represents flexible support that can be directed wherever it is most needed. When completing a Project, one Wild Aid token may substitute for one Resource Token of any type.
Wild Aid cannot be collected through the Take Resources action. It is earned by reserving a Project and is spent when used.
Why reserve Projects?
Reserving a Project allows a player to:
- secure a Project for future completion
- gain one Wild Aid Token
- reveal (turn face-up) a new Project when reserving from the Project Market
- create more options for future turns.
Understanding Community Resilience Goals
What You’re Trying to Achieve
Community Resilience Goals represent the broader outcomes the team is working toward. Projects generate Permanent Bonuses that represent lasting capacity; the goals show what that capacity can make possible. Although goals contribute points to the final score, their primary purpose is to connect individual investments and Projects with larger resilience outcomes.
Resilience Goal Areas
The Community Resilience Goals are informed by the broader value areas in British Columbia’s Disaster and Climate Risk and Resilience Assessment. For learning and gameplay, these have been organized into three interconnected dimensions: People, Systems, and Decisions.
| Goal Area | Focus |
|---|---|
| People | Strengthening the people, relationships, health, knowledge, and social connections that contribute to resilience. |
| Systems | Strengthening the physical, ecological, economic, and organizational systems communities depend upon. |
| Decisions | Strengthening leadership, planning, coordination, learning, and informed decision-making under changing conditions. |
Each hazard scenario includes three Community Resilience Goals:
- one People Goal
- one Systems Goal
- one Decisions Goal
During setup, place the three Community Resilience Goal cards associated with each selected Hazard Scenario in a shared area visible to all players.
How Goals Are Achieved
You achieve a Community Resilience Goal as soon as the Permanent Bonuses on your completed Projects meet the requirements shown on the Goal card. You may only count your own completed Projects; another player’s Projects cannot be used. Resource Tokens and Wild Aid do not count toward a goal.
Permanent Bonuses are never spent or used up. Once earned, they continue to reduce future Project costs and may count toward other Community Resilience Goals.
- Resource tokens cannot be used to achieve goals.
- Each goal is worth 6 points.
- Only one goal may be achieved per player per turn.
- Goals are achieved automatically once the requirements are met.
Resilience Goals are achieved through capacity built by individual players, but the team succeeds collectively. Players support one another through communication and role-specific trades so that more Projects can be completed and more goals achieved.
Important: Completed Projects and Permanent Bonuses belong to the player who earned them. They cannot be pooled, traded, or transferred. Resource Tokens may only be exchanged through the trade rules shown on the player mats.
Note: Meeting a goal’s requirements immediately achieves that goal; no additional action is required.
Key rule
Community Resilience Goals are achieved with the Permanent Bonuses shown on completed Projects — not with unspent Resource Tokens.
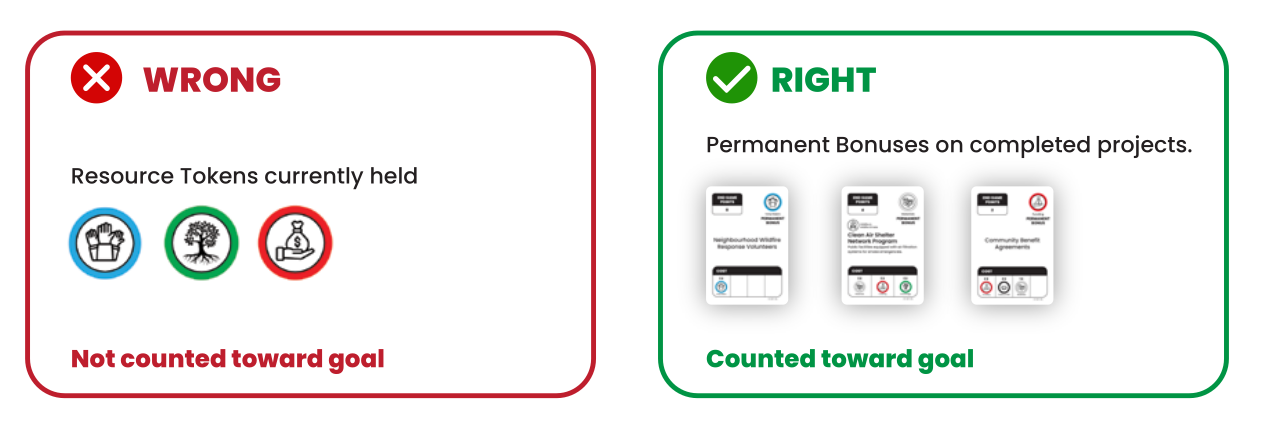
Figure 3. What counts toward Community Resilience Goals. Resource Tokens held in hand do not count. Permanent Bonuses generated by completed Projects.
Understanding Project Cards
Projects are the primary way players build lasting capacity in the game. Each completed Project:
- adds Points to the team’s final score;
- provides a Permanent bonus that remains in play; and
- contributes toward the requirements of Community Resilience Goals.
Projects represent real-world actions, programs, partnerships, investments, and initiatives that help strengthen resilience.
Reading a Project Card
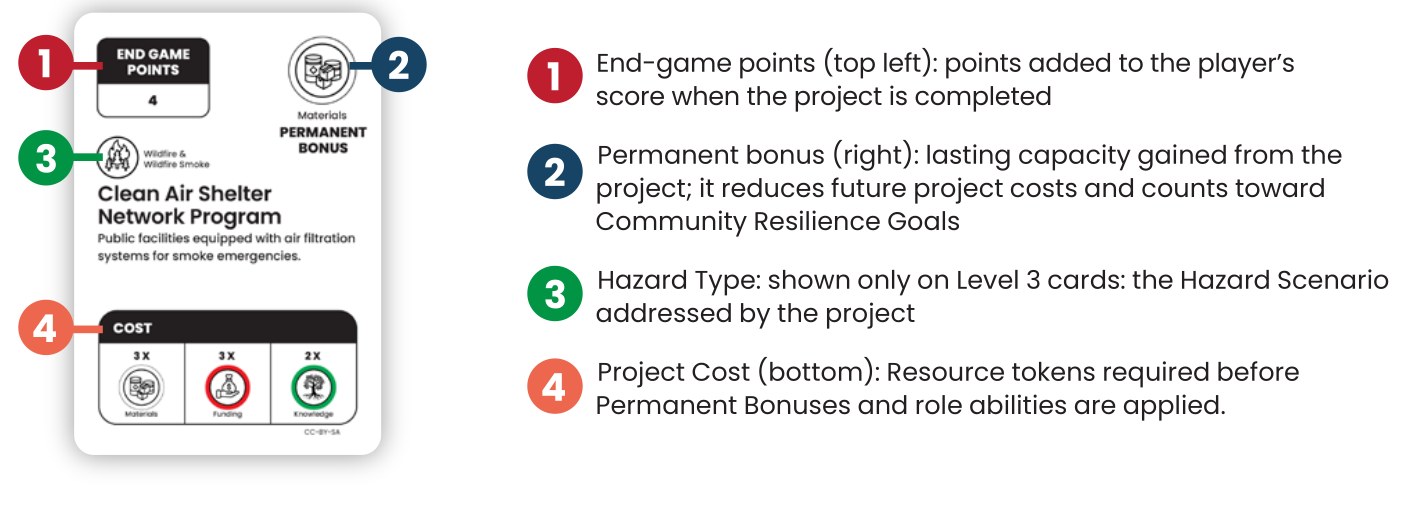
Figure 4. Project cards show the resources required, the points earned, and the permanent bonuses gained when completed.
Understanding Project Information
| Project Element | What It Means |
|---|---|
| End-game points | Points added to the team’s final score when the Project is completed. |
| Permanent Bonus | Represents capacity gained by completing the Project. Permanent bonuses remain available for the rest of the game and help players complete future Projects and achieve Community Resilience Goals. |
| Hazard Type | Level 3 Projects are linked to specific Hazard Scenarios. The relevant hazard is identified on the card. |
| Project Cost | Resource tokens required to complete a Project before Permanent Bonuses and role-based cost reductions are applied. |
Project Levels
Projects are organized into three levels of increasing investment and reward.
| Level | Description | Purpose |
|---|---|---|
| Level 1 | Foundational actions requiring fewer resources. | Build early capacity through points and Permanent Bonuses |
| Level 2 | More substantial initiatives requiring greater investment. | Expand capacity through additional scoring of points and Permanent Bonuses |
| Level 3 | Hazard-specific investments requiring the most resources. | Address selected Hazard Scenarios and provide the highest potential rewards (points and Permanent Bonuses) |
Building Toward Bigger Projects
Most teams begin with Level 1 Projects. As Permanent Bonuses accumulate, they reduce the Resource Token cost of later Projects, making Level 2 and Level 3 investments more achievable.
Successful teams balance immediate opportunities with longer-term efforts to build capacity, achieve Community Resilience Goals, and earn enough points to meet the Resilience Target.

Figure 5. Project progression. As players build capacity through early Projects, larger and more resource-intensive investments become increasingly achievable.
Understanding Permanent Bonuses
Capacity Built Over Time
Permanent Bonuses are central to the game. They represent lasting capacity created through completed Projects.
Unlike Resource Tokens, Permanent Bonuses are never spent or removed. Once earned, they remain available for the rest of the game.
Why Permanent Bonuses Matter
Permanent bonuses serve two important purposes:
| Permanent Bonuses Help You… | What They Do |
|---|---|
| Complete future Projects more easily | Reduce the Resource Token cost of Projects containing the matching resource type. |
| Achieve Community Resilience Goals | Count toward the requirements shown on Goal cards. |
1. Reduce Future Project Cost
Each Permanent Bonus acts as one ongoing unit of the matching resource type when calculating Project costs. It reduces the number of Resource Tokens you must spend, but the Bonus itself remains in play.
Example: reducing Project costs
| Resource | Project Requires | Permanent Bonus | Tokens spent |
|---|---|---|---|
| Funding | 2 | 1 | 1 |
| Knowledge | 2 | 1 | 1 |
| Volunteers | 1 | 1 | 0 |
| Total | 5 | 3 | 2 |
The player spends two Resource Tokens. The three Permanent Bonuses remain available for future Projects and goals.
Remember: Resource tokens are spent; Permanent Bonuses stay for the entire game.
2. Contribute to Community Resilience Goals
Permanent Bonuses also count toward Community Resilience Goals. As players complete Projects and build more capacity, additional goals become achievable.
In this way, Project Cards connect specific actions and investments with broader resilience outcomes.
Why Successful Teams Build Lasting Capacity
New players often focus on collecting Resource Tokens. More experienced players recognize that resources only create lasting value when they are invested in Projects, which create lasting capacity represented by Permanent Bonuses.
Permanent Bonuses reduce future Project costs, contribute toward Community Resilience Goals, and make larger investments possible. Successful teams therefore balance immediate resource needs with longer-term capacity building.
Think long-term
Resource Tokens help you complete the next Project.
Permanent Bonuses expand what becomes possible for the rest of the game.
Preparing to Play
Sections 4–5 · Your role, your player mat, and the eight setup steps.
4 Understanding Your Role Role perspectives and the six zones of your player mat
Roles and Community Perspectives
Every player takes on a role representing a different part of a community or region. Each role brings different strengths, resources, perspectives, and abilities to the game. Some roles are better positioned to generate particular resources, while others have abilities that support trading, Project completion, or collaboration.
No single role has everything it needs to build resilience alone. Understanding what other roles can contribute — and finding ways to work together — is an important part of the game.
Keep in mind
Your role gives you particular strengths, but not everything you need. Pay attention to what other players can contribute.
Your Player Mat
Your role is represented by a player mat.
Before the game begins, take a few minutes to review your mat and become familiar with the information it contains.
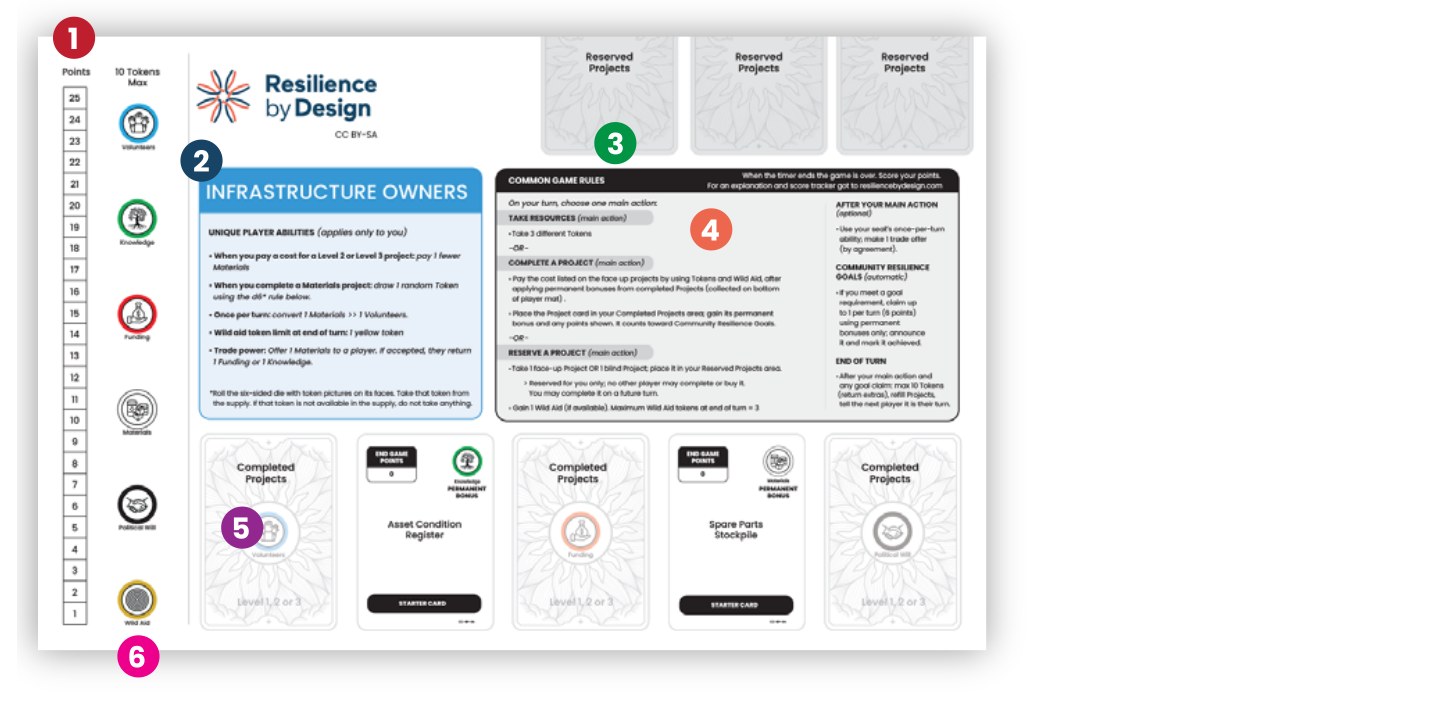
Figure 6. Your Player Mat. The player mat identifies your role abilities and provides spaces to track Projects, Permanent Bonuses, Resource Tokens, and points during play.
- Points track. Track the points you earn from completed Projects. The track also includes a reminder of the 10-token Resource Limit.
- Role abilities. Your role’s unique abilities, including any starting advantages, cost reductions, conversions, Wild Aid limits, or trade abilities.
- Reserved Projects area. Place Projects you reserve here. Reserved Projects belong to you and cannot be completed by another player. The standard limit is three; Local Government and Local Authority may reserve four.
- Gameplay reference. A quick reminder of the three Main Actions, Optional Trading, Community Resilience Goals, and End of Turn.
- Completed Projects area. Place completed Project Cards here. Their Permanent Bonuses remain in play and count toward Community Resilience Goals.
- Resource reference. The six resource types used in the game: Funding, Materials, Knowledge, Volunteers, Political Will, and Wild Aid.
First time playing?
You do not need to understand every aspect of your role before the game begins. Start with your role abilities and existing Permanent Bonuses. As the game unfolds, you will discover where your strengths can support the team and where you may need to collaborate with others.
Learning Through Play
You do not need to understand every role before the game begins. Part of the learning comes from discovering what different players can contribute as you play.
As the game unfolds, pay attention to:
- what strengths and abilities different roles bring;
- which partnerships emerge;
- when collaboration makes a Project or goal possible; and
- how different roles contribute to building resilience.
As players learn more about one another’s strengths, new opportunities for collaboration often emerge.
5 Game Setup Eight steps to complete before you start the timer
Setup establishes the challenge the community will face, the resilience outcomes or goals the team will work toward, and the projects and resources available during play.
Assemble the Game Components
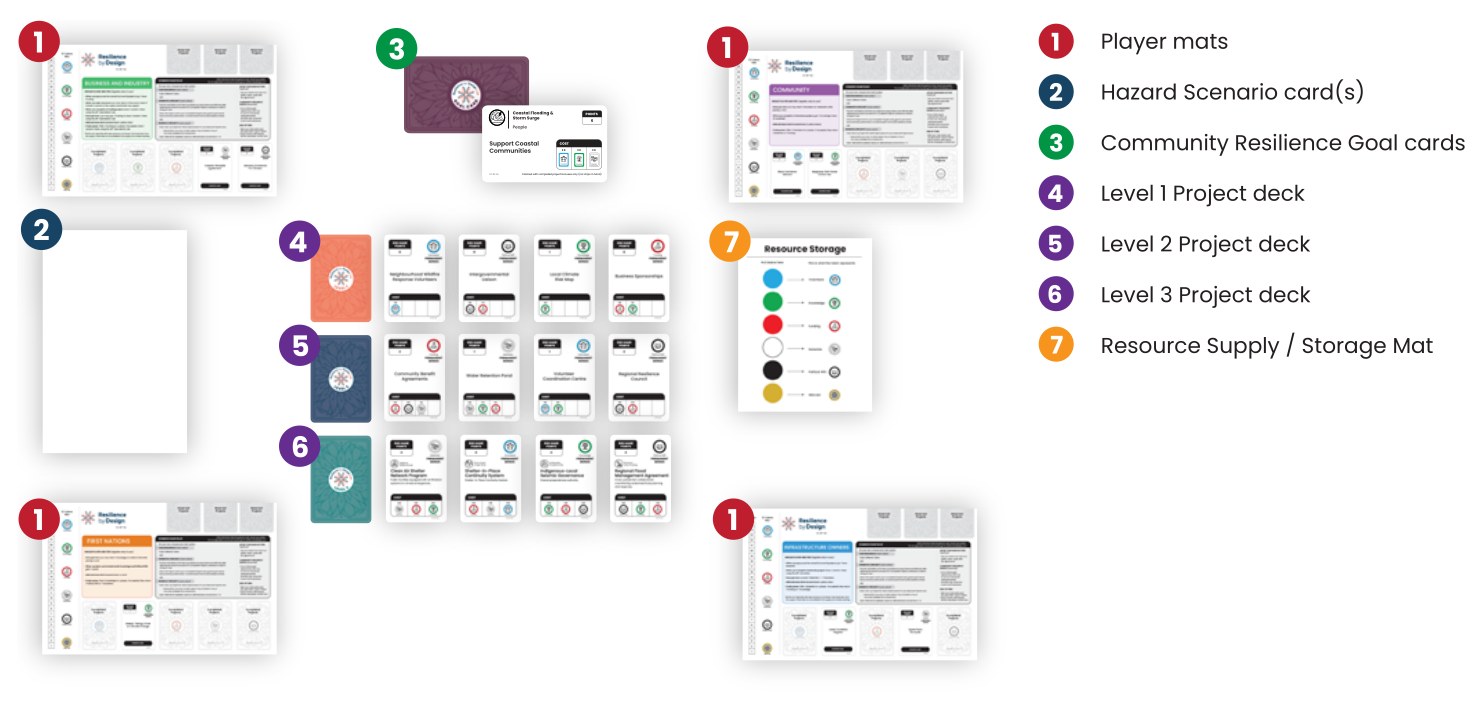
Figure 7. Game setup. Before play begins, arrange the player mats, selected Hazard Scenarios and Community Resilience Goals, Project decks and face-up Project Cards, Resource supply, Resilience Target, and timer as shown.
Follow the eight steps below before starting the timer.
Step 1 · Take Your Seat and Review Your Role
The game uses four player mats and is designed for four to eight players. Each mat represents a different role within a community or region. With more than four players, two people may share a role.
Roles may be assigned in advance, selected by the facilitator, or chosen by players during setup.
Before play begins, review:
- your role and Role abilities
- your Starting Projects and Permanent Bonuses; and
- your trade ability
Knowing your own strengths — and those of the other roles — will help you identify opportunities to contribute to the team.
You are playing a role
Try to make decisions from the perspective of the role you have been assigned. Part of the experience is seeing the challenge from a different position and exploring what different organizations and decision-makers can contribute to community resilience.
Step 2 · Choose Hazard Scenarios
As a group, select one or more Hazard Scenarios that reflect the community, region, or learning objectives you want to explore.
Each Hazard Scenario includes:
- common impacts
- common vulnerabilities
- useful resilience-building capacities
- three associated Community Resilience Goals:
- one People Goal
- one Systems Goal
- one Decisions Goal;
- a hazard-specific Level 3 Project deck
The hazards selected during setup determine the Community Resilience Goals and Level 3 Projects used in the game and increase the team’s Resilience Target.
Choosing Hazard Scenarios
For a first game, begin with one Hazard Scenario. Once players are familiar with the game, additional hazards can be added to increase complexity and create more Project and goal opportunities.
Each additional Hazard Scenario:
- adds three Community Resilience Goals
- adds another set of hazard-specific Level 3 Projects and opportunities
- increases the Resilience Target by 5 points
Additional hazards create more options for investment and goal achievement, while also raising the number of points the team must earn.
Step 3 · Place Community Resilience Goals
For each selected Hazard Scenario, place its three associated Community Resilience Goal cards — People, Systems, and Decisions — in a shared area where everyone can see them.
These are the broader resilience outcomes the team will work toward during the game.
Community Resilience Goal cards
Keep these cards visible throughout the game. They show the lasting capacities your community is working to build and the permanent bonuses needed to achieve them.
Step 4 · Set the Resilience Target
Begin with the base Resilience Target of 56 points and add 5 points for each selected Hazard Scenario.
Record the final target somewhere visible to all players.
Calculating the Resilience Target
Base Resilience Target = 56 points
Each selected Hazard Scenario = +5 points
The Resilience Target is the team’s collective scoring goal. Points from completed Projects and achieved Community Resilience Goals count toward the target.
Step 5 · Prepare the Project Decks
Separate the Project cards into:
- Level 1 Projects
- Level 2 Projects
- hazard-specific Level 3 Projects
Shuffle the Level 1 and Level 2 decks separately.
Select the Level 3 deck for each Hazard Scenario in play. If more than one hazard is selected, combine the relevant Level 3 cards and shuffle them together.
Place the three Project decks in the centre of the table. Draw four cards from each deck and place them face up beside the corresponding deck to create the Project Market.
Hazard-specific Projects
Level 3 Projects are linked to the Hazard Scenarios selected for the game. If more than one hazard is in play, the relevant Level 3 cards are combined into a single deck.
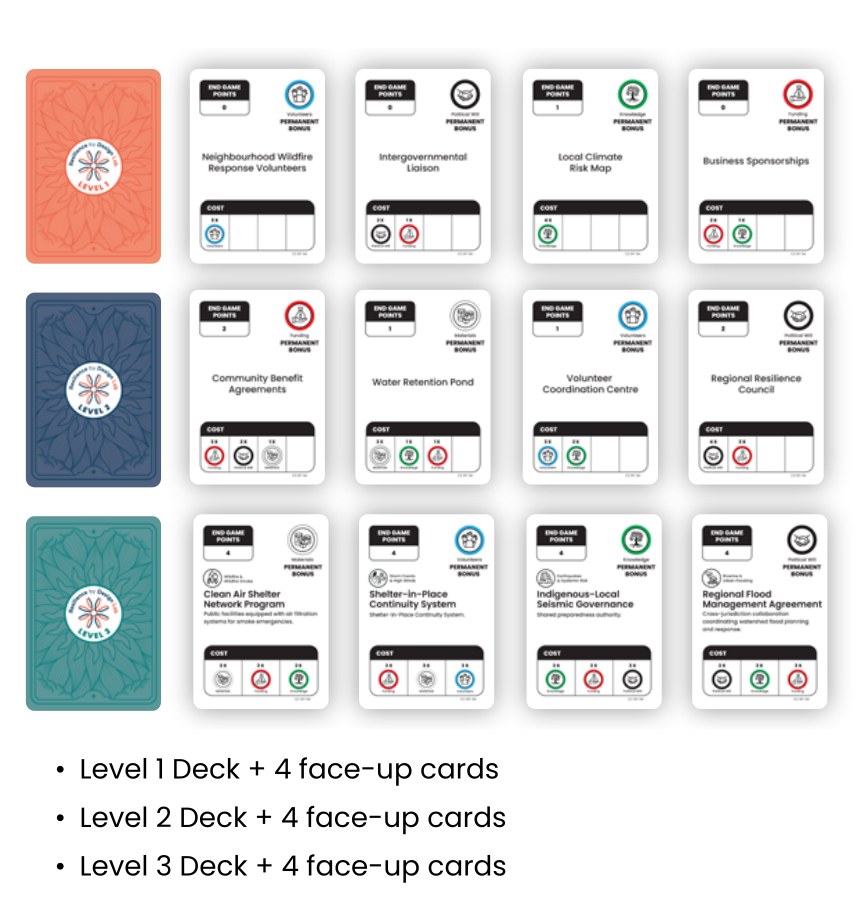
Figure 8. Players may complete or reserve any face-up Project that meets the requirements of play. New Projects are revealed as face-up Projects are completed or reserved.
Step 6 · Set up Resource Supply
Place the Storage Mat where all players can reach it. Add 7 Resource Tokens of each type:
- Funding7
- Materials7
- Knowledge7
- Volunteers7
- Political Will7
- Wild Aid5
Add 5 Wild Aid tokens.
Remember: Wild Aid cannot be collected through the Take Resources action. It is earned when a player reserves a Project.
Step 7 · Review Starting Projects and Permanent Bonuses
Each role begins with a unique combination of one or more Starting Projects and associated Permanent Bonuses representing capacity already present in the community.
These starting Projects and bonuses reflect strengths, assets, and investments that exist before gameplay begins. Players do not begin with Resource Tokens. These are collected during gameplay.
Communities don’t start from zero
Every community begins with existing strengths, assets, relationships, and capacities. Starting Projects and Permanent Bonuses represent investments and capabilities already in place that players can build upon during the game.
Communication, support, and cooperation are often more important than the resources you hold.
Step 8 · Set the Timer
Set a timer for 60 minutes. In the game, this represents one fiscal year of community decision-making and investment.
When the timer starts, gameplay begins.
One year to build resilience
The 60-minute game represents a single fiscal year in which players must decide where to invest limited time and resources.
The challenge is to work together to complete Projects, build lasting capacity, achieve Community Resilience Goals, and earn enough points to meet or exceed the Resilience Target before the year ends.
Gameplay
Sections 6–9 · The turn sequence, the three Main Actions, trading, and the end-of-turn checklist.
6 How to Play Overview of a turn and the value of talking to each other
Once the timer starts, players work together to build resilience by collecting resources, completing projects, building Permanent Bonuses, and achieving Community Resilience Goals. Each player manages their own resources, projects, and Role Abilities, but the team works toward a shared Resilience Target. Play continues until the 60-minute timer expires.
Talk to each other
Teams that communicate regularly often perform better than teams that focus only on individual Projects.
Discuss:
- which Community Resilience Goals are within reach
- which Projects could build useful Permanent Bonuses
- who needs particular resources; and
- how Role Abilities and trades might support the team
Overview of a Turn
Each turn follows the same simple sequence:
- Choose one Main Action.
- Resolve the action.
- Make one optional trade offer.
- Complete the End-of-Turn Checklist.
Remember to check for newly achieved Community Resilience Goals and to check the Resource limit.
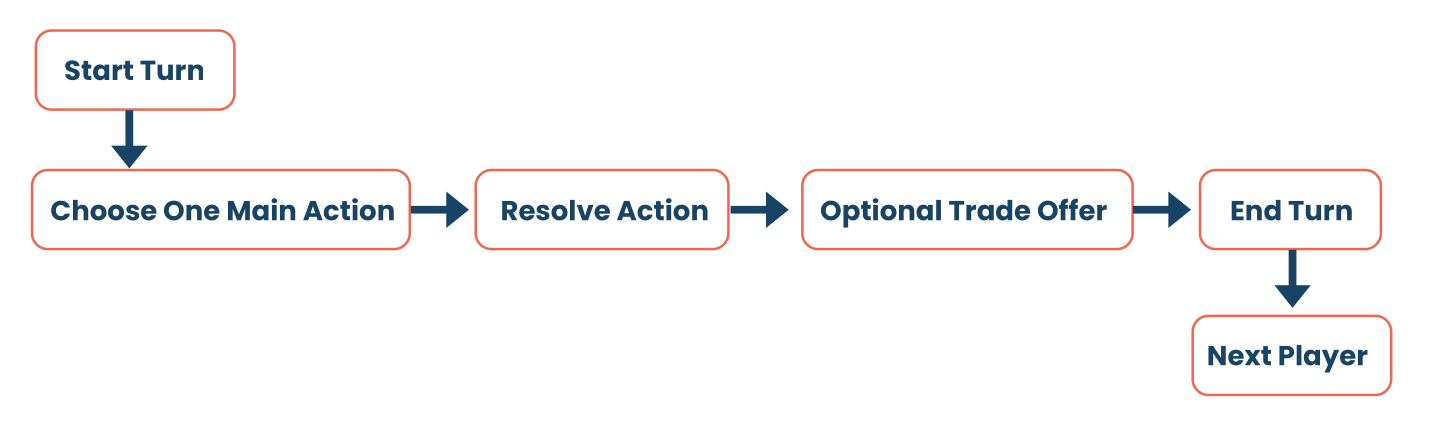
Figure 9. Turn sequence. Each turn follows the same sequence; only the Main Action changes.
7 Turn Actions Take Resources · Complete a Project · Reserve a Project
- Take Resources — acquire resource tokens to complete projects
- Complete a Project — complete projects to earn points and Permanent Bonuses
- Reserve a Project — reserve projects to secure them for future and gain Wild Aid token
Each action serves a different purpose:
- Take Resources — acquire the Resource Tokens needed to complete Projects
- Complete a Project — earns points and builds Permanent Bonuses
- Reserve a Project — secure a future Project and gain Wild Aid
Remember: Resilience Goals are achieved automatically when a player has acquired the necessary Permanent Bonuses by completing Projects. They do not require a Main Action. See section 3 for the full goal requirements.
The following sections explain each action in detail.
Action 1 — Take Resources
Choose this action when you need Resource Tokens to complete Projects.
When you take Resource Tokens, collect them from the Resource Market (the shared supply) and place them on your player mat.
How to Take Resources
- Most roles take 3 different Resource Tokens of their choice
- The Province may take 4 different Resource Tokens instead of 3.
- You may take only one token of each resource type during this action
- You may only take tokens currently available in the Resource Market.
Examples
Allowed
- Funding + Materials + Knowledge
- Volunteers + Political Will + Funding
Not allowed
- 2 Funding + 1 Materials
- 3 Funding
Resource limit
You may hold a maximum of 10 Resource Tokens at any time.
If you exceed the limit, immediately return tokens of your choice to the shared supply until you are back at 10.
Wild Aid does not count toward this limit.
Wild Aid
Wild Aid cannot be collected through the Take Resources action.
It is earned by reserving a Project.
Strategy Considerations
Think ahead
Before taking resources, consider:
- which Projects are you closest to completing?
- which Permanent Bonuses would be most useful?
- which Community Resilience Goals are within reach?
- could another player make better use of a resource through trade?
Action 2 — Complete a Project
Completing Projects earns points and builds the Permanent Bonuses needed to reduce future Project costs and achieve Community Resilience Goals.
How to Complete a Project
- Choose a face-up Project from the Project Market or one of your Reserved Projects.
- Check the Project cost.
- Apply your Permanent Bonuses and any relevant Role Ability.
- Spend the remaining required Resource Tokens, using Wild Aid if needed.
- Move the Project Card to your Completed Project area.
- Add the Project’s points to your score. Its Permanent Bonus is now active.
Don’t forget your Permanent Bonuses
Apply Permanent Bonuses before spending Resource Tokens. They reduce Project costs but are never spent.
Completing Face-Up Projects
You may complete any face-up Project in the Project Market if you can meet its cost. After completing it, immediately draw a replacement card from the same deck.
Completing Reserved Projects
Players may also complete Projects they have previously reserved.
Reserved Projects may only be completed by the player who reserved them.
After a reserved Project is completed, move it from the Reserved Projects area to the Completed Projects area.
Gain Points and Permanent Bonuses
When a Project is completed:
- Add the Project’s points to your score.
- Gain the permanent bonus shown on the card.
- Place the Project in your Completed Projects area.
The permanent bonus remains available for the rest of the game.
Projects do more than score points
Completed Projects also build Permanent Bonuses that reduce future Project costs and contribute toward Community Resilience Goals.
Reserving a Project not only secures future options for completing, but also for gaining Wild Aid.
Action 3 — Reserve a Project
Reserving allows you to secure a Project for future completion and gain one Wild Aid token.
How to Reserve a Project
- Choose either
- a face-up Project from the Project Market; or
- the top card of one Project deck.
- Place the card in your Reserved Projects area.
- Take 1 Wild Aid token from the supply.
- If you reserved a face-up Project, immediately replace it from the corresponding deck.
Reserving Face-Up or Face-Down Projects
Take any card from the Project Market, face up or face down. A face-down card comes from the top of the pile. Place it in the reserve area at the top right of your player mat. Then take 1 Wild Aid token.
Once reserved, you may reveal the card and discuss it with other players.
Wild Aid
Reserving a Project earns 1 Wild Aid token. When completing a Project, Wild Aid may substitute for one Resource Token of any type. Wild Aid is spent when used.
Reserved Project Limits
Most players may hold up to 3 Reserved Projects at a time. Local Government and Local Authority may hold up to 4, as shown on their player mats.
If your Reserved Projects area is full, you must complete one before reserving another.
Plan ahead
Reserving can help you secure a valuable Project, gain Wild Aid, or prepare for a future Community Resilience Goal. But reserved Projects take up limited space, so choose strategically.
8 Trading and Collaboration One optional trade offer per turn, using your role’s Trade Ability
Making a Trade
On your turn, you may make one trade offer using the Trade Ability shown on your player mat. The receiving player may accept or decline the offer. If accepted, resolve the trade immediately.
Each player may make only one trade offer per turn.
A trade may be offered either before or after the Main Action.
Trading is optional
You are never required to trade. Trading can, however, help players complete Projects, build useful Permanent Bonuses, and work toward shared Community Resilience Goals.
Role-Specific Trade Abilities
Each role has a different Trade Ability. All trade offers must follow the rules shown on the active player’s mat.
Trading Strategically
A useful trade may help you — or another player — complete a Project, gain an important Permanent Bonus, or move closer to a Community Resilience Goal.
Share what you need and what you can offer. The game rewards players who recognize how different roles can support one another.
9 End of Turn The four-item checklist before play passes on
After resolving your Main Action and optional Trade Action, complete the End-of-Turn Checklist before play passes to the next player.
End-of-Turn Checklist
- Check for any newly achieved Community Resilience Goal.
- Confirm that you are within your Resource Limit.
- Confirm that your score and Completed Projects are up to date.
- Pass play clockwise to the next player.
Balancing discussion and action
Collaboration is essential, but time is limited. The game represents a single fiscal year, so teams must balance discussion and planning with timely decisions and action.
Learning, Scoring, and Reflections
Sections 10–12 · Scoring, the optional adaptation round, and debrief questions.
10 Game End and Scoring Adding up the Final Score and comparing it with the target
When Does the Game End?
The game ends when the 60-minute timer expires. Finish the current player’s turn, then proceed to scoring.
Calculate Your Score
The team’s final score combines:
- points earned from completed Projects
- points earned from achieved Community Resilience Goals
Add these together to calculate the team’s Final Score.

Figure 10. Final scoring. Add points from completed Projects and achieved Community Resilience Goals, then compare the total with the team’s Resilience Target.
Compare Your Score to the Resilience Target
Compare the team’s Final Score with the Resilience Target established during setup.
If Your Team Meets or Exceeds the Target
Your team has met the game’s Resilience Target for the selected Hazard Scenarios.
If Your Team Falls Short of the Target
Your team has made progress but has not yet reached the game’s Resilience Target.
Resilience is built over time
The purpose of the game is not simply to achieve the highest score. Resilience develops through many investments, relationships, decisions, and actions working together over time.
The Final Score provides one measure of progress in the game. The conversations, decisions, and insights generated along the way are equally important to the learning.
11 Optional Extension: Learning and Adaptation Round A 15-minute second run at the same board
Resilience depends not only on action, but also on the ability to learn from experience and adjust course.
If time allows, teams can complete a short Learning and Adaptation Round after the initial game has been scored. The purpose is to apply what was learned in the first round and see whether a different approach changes the team’s results.
Step 1 — Reflect
Take 5–10 minutes to discuss:
- What worked well?
- Where did the team struggle?
- Which decisions or investments had the greatest impact?
- What would you do differently if you had more time?
Step 2 — Continue Play
Set the timer for an additional 15 minutes and continue playing from the current game state.
Nothing is reset:
- Resource Tokens remain in play
- Permanent Bonuses remain in play
- Completed Projects remain completed
- Achieved Community Resilience Goals remain achieved
- Reserved Projects remain reserved
Continue scoring new Projects and goals as usual.
Step 3 — Apply What You Learned
Use the additional time to test a different strategy, improve coordination, or act on lessons from the first round.
At the end of 15 minutes, calculate the team’s new Final Score and compare it with the original result.
Learning is part of resilience
Communities rarely get everything right the first time. An important resilience capacity is the ability to learn from experience, adjust decisions, and improve over time.
The Learning and Adaptation Round allows players to experience that process directly.
Debrief the Adaptation Round
- What did you change?
- Which lessons from the first round influenced your decisions?
- Did collaboration or coordination change?
- Did your Final Score change? Why?
- What does this suggest about the role of learning and adaptation in building resilience?
12 Reflection and Discussion Debrief prompts across five themes, plus the Big Question
Scoring marks the end of gameplay, but often the beginning of the most valuable conversations.
Use the questions below to explore what happened during the game, why it happened, and what the experience might suggest about building resilience in your own community, region, or organization.
Collaboration
- When did collaboration make a difference?
- Which roles or relationships became particularly important?
- What made collaboration easier or more difficult?
Capacity Building
- Were there moments when working independently limited what the team could achieve?
- Which Permanent Bonuses became most valuable, and why?
- When did you begin thinking beyond Resource Tokens to the capacity you were building?
- Which Investments made later actions easier?
- Which Community Resilience Goals were easiest or hardest to achieve, and why?
Decision-Making
- How did the team decide what to prioritize?
- What trade-offs did you face?
- How did time pressure affect your decisions?
- How did you balance immediate opportunities with longer-term resilience goals?
Roles and Perspectives
- How did your assigned role shape the way you approached the game?
- What did you learn about the priorities, strengths, or constraints of other roles?
- Did any role become more or less important than you expected?
- Where did you see opportunities for stronger cross-sector or cross-jurisdictional collaboration?
Real-World Application
- What existing capacities or strengths did the game make you think about in your own community or organization?
- Where are there important capacity gaps?
- Which relationships or partnerships would matter most in addressing those gaps?
- Where do responsibilities or decisions cross organizational or jurisdictional boundaries?
- Is there one insight from the game that could inform a real conversation, decision, or action?
The big question
What would it take for the people, organizations, systems, and decision-makers represented in this game to work together more effectively to build resilience in your community or region?
Quick Reference Guide
Always open · the one-page rules summary to keep beside the table.
Roles & Setup
Players & Roles
- 4–8 players using 4 player mats.
- Each mat represents a different community or regional role.
- With more than four players, two people share a role.
- Review your Role Abilities, Starting Projects, Permanent Bonuses, and Trade Ability.
Setup
- Assign roles and review player mats.
- Select Hazard Scenario(s).
- Place associated Community Resilience Goals.
- Calculate the Resilience Target.
- Prepare the Project Market.
- Set up the Resource supply.
- Review Starting Projects and Permanent Bonuses.
- Set the timer for 60 minutes.
Turn Sequence
- Choose one Main Action.
- Resolve the action.
- Optional Trade Offer.
- Complete the End-of-Turn checklist.
- Pass play clockwise.
Main Actions
Take Resources
- Take 3 different Resource Tokens
- Province may take 4 different Resource Tokens
- Take no more than one of each type.
- Wild Aid cannot be taken using this action.
- Maximum Resource Limit per player is 10 excluding Wild Aid tokens.
- Funding + Materials + Knowledge
- 2 Funding + 1 Materials
Complete a Project
- Choose a face-up or Reserved Project.
- Apply Permanent Bonuses and relevant Role Abilities.
- Spend the remaining Resource Tokens/Wild Aid.
- Move the card to Completed Projects.
- Add its points to your score.
- Its Permanent Bonus is now active.
- Replace a completed face-up Project Card.
Reserve a Project
- Reserve a face-up Project or the top card of a Project deck.
- Place it in your Reserved Projects area.
- Gain 1 Wild Aid.
- Replace the card if it came from the face-up Project Market.
Resource Rules
Resource supply (Resource Market)
- 7 Funding
- 7 Materials
- 7 Knowledge
- 7 Volunteers
- 7 Political Will
- 5 Wild Aid
Resource Limit
- Maximum 10 Resource Tokens per player excluding Wild Aid
Wild Aid
- Earn 1 when you reserve a Project.
- May substitute for any one Resource Token when completing a Project.
- Cannot be collected through Take Resources.
- Is spent when used.
Permanent Bonuses
- Earned through completed Projects.
- Reduce matching Project costs.
- Are never spent.
- Count toward Community Resilience Goals.
Resource Tokens = spent
Permanent Bonuses = remain in play
Community Resilience Goals
Goal Rules
Goals are achieved through Permanent Bonuses earned from completed Projects — not resource tokens.
- A goal is achieved when the Permanent Bonuses on your completed Projects meet the requirements shown on the Goal card.
- Only your own completed Projects count.
- Resource Tokens and Wild Aid do not count.
- Permanent Bonuses are not used up and may count toward other goals.
- Each Community Resilience Goal is worth 6 points.
- Only one goal may be achieved per player per turn.
Each Hazard Scenario includes 1 People Goal, 1 Systems Goal, and 1 Decisions Goal.
Trading, Reserves & End of Turn
Trading
- One optional trade offer per turn.
- Make optional trade offer before or after Main Action.
- Follow the Trade Ability on the active player’s mat.
- The receiving player may accept or decline.
Reserved Projects
- Standard maximum: 3
- Local Government and Local Authority maximum 4.
- Reserved Projects may only be completed by the player who reserved them.
End of Turn Checklist
- Check for any newly achieved Community Resilience Goal.
- Confirm that you are within your Resource Limit.
- Confirm that your score and Completed Projects are up to date.
- Pass play clockwise to the next player.
Game End & Scoring
Game End
The game ends when the 60-minute timer expires. Finish the current player’s turn, then calculate the Final Score.
Final Score
Completed Project Points
+ Community Resilience Goal Points
= Final Score
Compare the Final Score with the Resilience Target.
Resilience Target
Base Target = 56
Each Hazard Scenario = +5
- 1 Hazard = 61
- 2 Hazards = 66
- 3 Hazards = 71
Learning, Adaptation & Closing
Optional Learning and Adaptation Round
- Reflect for 5–10 minutes on what worked and what you would change.
- Continue play for 15 minutes without resetting the game.
- Apply what you learned.
- Recalculate the Final Score and compare the result.
How Resilience is Built in the Game
Resources help complete Projects.
Projects build Permanent Bonuses.
Permanent Bonuses help achieve Community Resilience Goals.
Projects and goals generate the points needed to meet the Resilience Target.
Key Idea
Resources make action possible. Projects turn those resources into lasting capacity. That capacity makes broader resilience goals achievable — and collaboration is what helps the whole system work.
The Game Is Only Part of the Learning
Take time after play to discuss what happened, why it happened, and what the experience suggests about resilience, collaboration, and capacity building in your own community or organization.
Resilience by Design Game Guide. A Serious Game for Climate Preparedness & Resilience. Licensed CC BY-SA. Value areas align with those established in the DCCRA report; goal areas are informed by British Columbia’s Disaster and Climate Risk and Resilience Assessment.